Before You Start
Instructions for saving images and printing to scale. How to print on fabric.

Fabrics, etc.
Miniature quilts, fabrics and wallpapers

Furniture
Have a seat!

Accessories
small projects and other decorative pieces

New Additions
What's new?

Links

E-mail

Printable Mini Hibachi Grill


Materials:

5" x 8" Card stock (or recycled greeting card)
Tacky glue
Black acrylic craft paint
4 whole peppercorns or small beads for feet
2 small long wooden beads or wooden skewer cut to size for handles
2 Small pieces screening for grilling surface
a few pieces of aquarium charcoal, gravel or baked fimo for "charcoal"
 
scissors
razor knife
straight edge
small paintbrush


(right) click on the image to save as a desktop file


Hibachi Grill Instructions:

  • Copy and save grill printie to your desktop then print on card stock or light cardboard.
  • Cut out grill and lining. Score well on fold lines.
  • Carefully cut out shaded areas on grill and grill lining using razor knife.
  • Shape main grill body. Glue tabs to inside, side tabs first, then top tabs over all.
  • Fit and trim grill lining. Glue to inside making sure to match cut away portions of firebox.
  • When glue is dry, paint inside and outside with black acrylic craft paint. Let dry.
  • Glue seed or beads to corners of bottom for feet. Add handles to outside of two grill sides.
  • Cut screening to fit inside firebox, a little above firebox cut out. Glue charcoal to screen and place inside grill when dry. Cut larger piece of screen for top grilling surface.


Craft hint!

Polymer clays like Fimo or SculpeyIII can be boil cured instead of baked. The finish will be dull but is suitable for painting.

Place shaped pieces on a spoon and lower into boiling water. Gently boil for ten minutes. Remove and dry well before painting.

Though painting polymer clay is not generally recommended, the boiled samples pictured have held up well for over 2 years with no harmful effects.

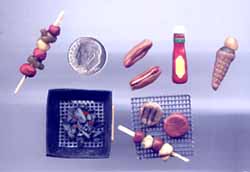
Some barbeque additions....

To Make Charcoal - glue a few small bits of aquarium filter carbon to a small piece of screen cut to fit inside grill. Dab some bright red or orange acrylic paint into "coals" to simulate burning. Lightly brush a faint layer of gray here and there over coals to duplicate burnt ash.

Since I never have a large collection of colors, all of the food pictured was made from a light colored Sculpey, painted with craft acrylics, and sealed with a clear satin water based acrylic sealer.

Pierce shishkebob pieces in center with toothpick before curing so they can be thread on and glued to a small toothpick.

To make the waffle texture of the ice ceam cone, press a small piece of flattened clay onto a piece of screening like that used for grill.


 Except as noted
this site and all contents
© 2001-2003 by Christine Woolsey
All Rights Reserved
Commercial use by permission only